Presentation
µBurner is my compact CNC Laser Engraver, made mostly from recycled materials. With its low power laser (about 200mW), it can engrave on wood, dark plastic, ... and even cut through thin cardboard. It only measures 15x15x20cm and is very easy to operate.
This short time-lapse shows the machine engraving a flask logo on a piece of wood.
In this article, I show how I designed, built and operate this machine.
Material list
To build this machine, I used:
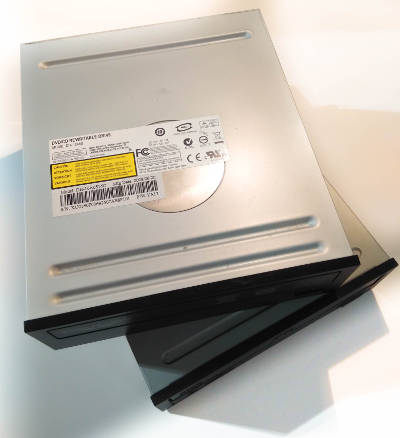
- 2 x 5 ¼ inch DVD drive (free)
- 12V computer fan 40mm (free)
- 12V power supply (free)
- 40 cm of 0.75x0.75mm aluminum square tube ($1 per meter)
- Laser heatsink ($1.50)
- Scrap pieces of 2mm aluminum sheet (free)
- Arduino nano ($2)
- XL4015 DC-DC Buck converter module ($1)
- 2 x DRV8825 stepper motor controller boards ($1 each)
- 200mW laser module ($10)
- Miscellaneous components: a IRF3205 N-MOSFET, 2 x 100µF capacitors, one 100k resistor, headers (male & female), 2 x switches, 1 x 5.5mm barrel plug, a piece of perfboard (about $3)
Total: ~$20 (or $10 if the laser diode is recovered from DVD burner drives)
Frame
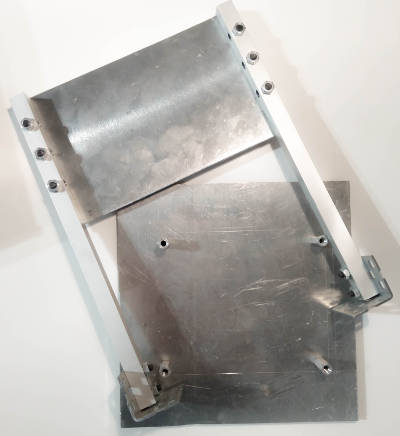
I chose to make the frame fully out of aluminium. It makes it a lot stronger that it needs to be, but I wanted to train my metal machining skills.
The main parts of the frame are the moving axes, which are recovered from the DVD drives. One downside of using these motor assemblies is the small throw, resulting in a tiny 40x40mm usable engraving area.
The frame holds the axes perpendicular to each other. In my case, the Y axis moves the surface and the X axis is the moving laser.
Then, the DVD drives moving assemblies get attached to this frame.
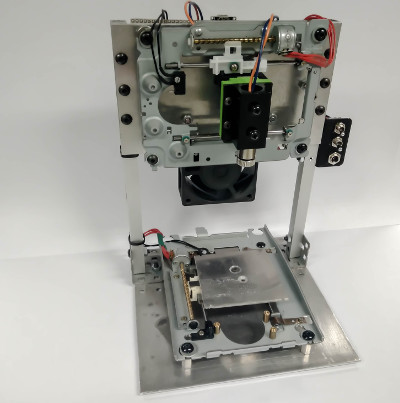
The fan ensures that the fumes from the engraving do not accumulate on the laser focusing lens, eventually destroying it.
I also added limit switches to both axes. Although it is not required, it allows using a very practical function: homing. Homing is the automatic return to the origin (the "zero" position).
Finally, I built an enclosure to protect the users' eyes from the intense laser radiation.
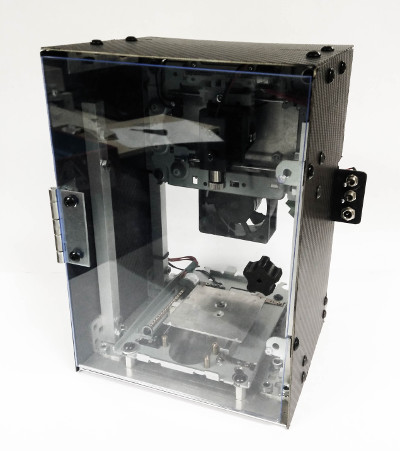
It is made from FR4 (epoxy with fiberglass reinforcement) with an acrylic window. To block most of the radiation form the laser light, I ordered a window tint film for cars, with a 5% VLT rating (Visible Light Transmission). Magnets are used to lock the door, and the knob is 3D-printed.
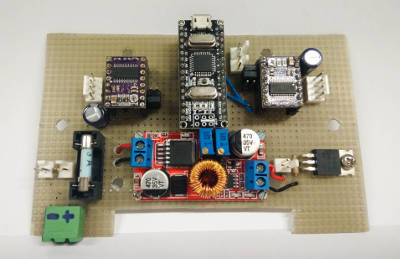
Electronics
The electronic circuit is based on the grbl default configuration of inputs and outputs.
I soldered everything on a piece of perfboard. I used connectors to be able to take it apart. The switches and power supply plug are one a separate bracket to make them accessible for the user.
An alternative to this would have been to use a readily available CNC Shield 1.4 for the Arduino Uno. Much easier, probably cheaper, but less interesting for sure!
Configuration: for the DRV8825 motor drivers to work properly, the output current has to be precisely trimmed using the potentiometer. If it is set too low, the motors will not move. If it is set too high, the motors will overheat and eventually burn out. For these small DVD motors, I recommend to start at zero (fully clockwise) and slowly turn counterclockwise while pulsing the STEP input. As soon as they start moving, stop there.
The Laser
Warning: a 200mW laser is powerful enough to permanently damage eyes in a matter of seconds. A lot of precaution must be taken when using these dangerous devices.
Initially, I wanted to use a DVD drive burner laser. It would have been very cheap, only costing the price of the focusing lens. This was my circuit:
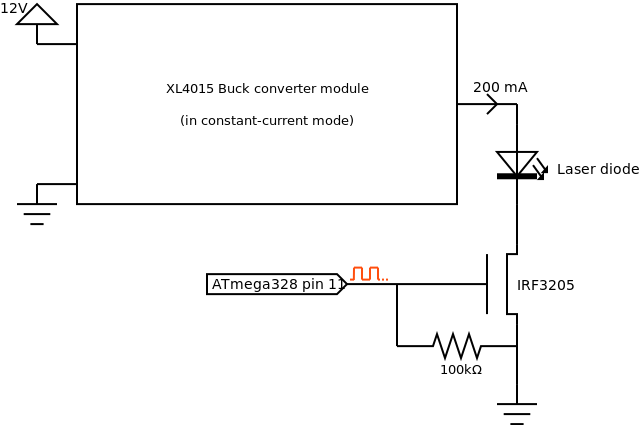
This provides a constant current to the laser diode, controlled by a PWM output of the micro-controller. Unfortunately, DVD drive laser diodes are very fragile and susceptible to breakage by ESD (electrostatic discharges). After unsuccessfully recovering two of them, I bought a 200mW laser module for AliExpress. This is the circuit I currently use to drive the laser module.
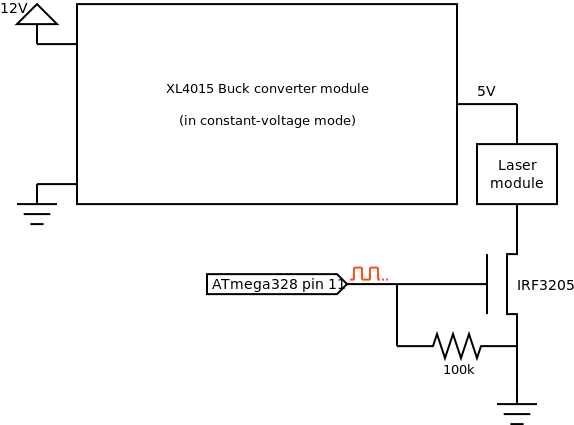
This way, the XL4015 module delivers a constant, stable 5V to the laser module whenever the ATmega sends a high on its logic output. The laser module is a constant current driver with a laser diode in a metal housing with a focusing lens.
The laser has to be focused before engraving anything. This is done after the firmware is flashed on the Arduino, by sending the G-code command M3 S5 and turning the lens screw to get the smallest laser dot possible.
Software and operation
In order to control the machine, the Arduino must have a G-code interpreter on it. I use grbl. To program it on the Arduino nano, follow the instructions on the official grbl wiki.
To interact with the machine, I use LaserGRBL. It is a great open-source piece of software, with everything bundled to use an Arduino based CNC laser engraver : configuration, raster image import, G-code generation, etc.
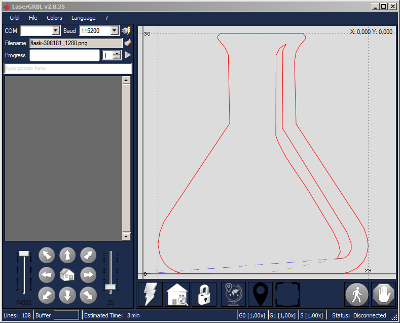
Finally, there is a bit of configuration required in order to set-up the machine. LaserGRBL makes this configuration easier through the GRBL>Configuration menu. Every option is well detailed in the grbl wiki.
Author: Charles Grassin
What is on your mind?
Sorry, comments are temporarily disabled.
No comment yet!