Presentation
A 3D printer is a great tool for prototyping and projects. My Anet A8 is a great printer but unfortunately, it takes a lot of space, cannot be transported easily, and slightly lacks reliability (especially after being moved). Given that about 95% of my prints fit in a 10cm cube, I wanted a smaller and better unit for my daily usage.
Skeleton 3D is a great open-source 3D printer designed by Catastrophee, a French maker. It is a compact, robust and inexpensive machine with a 100x100x100mm printing volume. One huge advantage of his design is that there is a minimal number of moving parts.
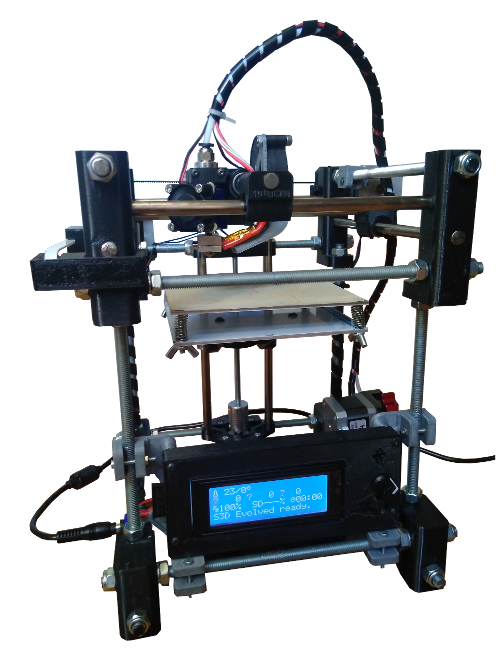
While the original design prints, it had a few flaws that I wanted to address. My S3D Evolved partial redesign includes:
- A new Z axis carriage: more robust and less Z wobble.
- A E3D Bowden extruder (instead of the original Aluhotend): better print quality with higher printing speeds.
- Screen and attachement for the electronics: ease of transportation and usage. Also adds rigidity to the frame.
- Part cooling fan & fan duct: better print quality.
These new parts are fully compatible with the original Skeleton 3D.
Update: S3D Evolved is now released on thingiverse: here!
Parts and cost
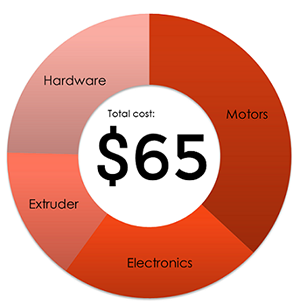
The complete bill of material (BOM) is in the archive at the end of this article. This graph shows the repartitions of costs in this machine:
There is about 30 hours worth of 3D printing required to build the printer. If you don't have access to a 3D printer, you could ask a local makerspace. Considering the 3D material, PETG or ABS should be preferred over PLA, if possible. They have indeed better thermal and physical resistance. I used 3DFilTech Black PETG from our sponsor Imprimante3DFrance which is both easy to print and incredibly resilient.
Quick assembly guide
The assembly of this printer is fairly straightforward, although it may be challenging for newcomers in the 3D printing world. This guide will give you an overview of how the machine is mounted.
The first step is the assembly of the bottom part with 240mm M8 threaded rods. You must make sure that the spacing between the connectors is exactly 190mm.
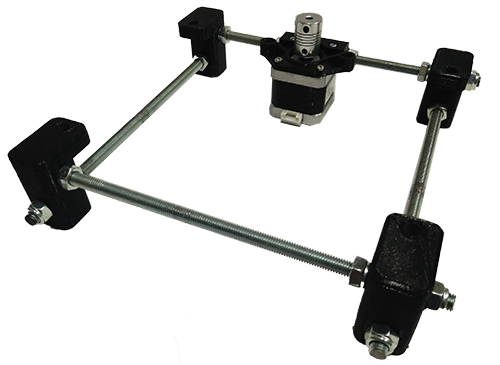
Next, you can assemble the top in a similar fashion. Attach the connectors with the 240mm M8 threaded rods without forgetting to put the Z axis top plate on one side and the motor and pulley supports as shown on the picture. You must make sure that the spacing between the connectors is exactly 190mm. Then, the 220mm smooth rods can be slided with the LM8UU linear bearings in place.

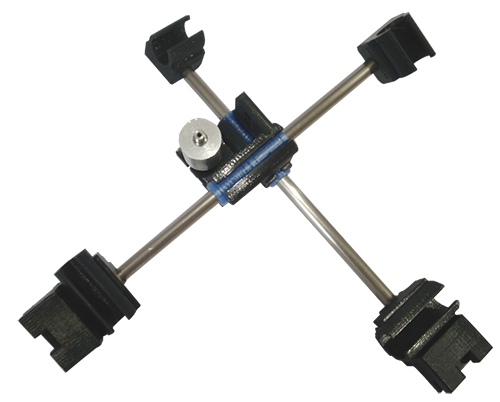
The Z axis carriage can be assembled next. The plastic parts are attached together with M3x15mm bolts and nuts, and the LM8UU are secured with zip ties. To cut and drill the two plates, I included 2D templates in the archive at the end of this article.
Then, the three previous parts can be connected to complete the frame of S3D Evolved. The top part gets attached to the bottom part with 190mm M8 threaded rods, with a spacing of 140mm between the connectors.
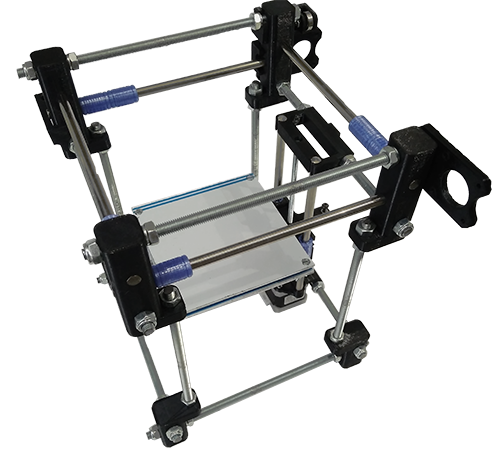
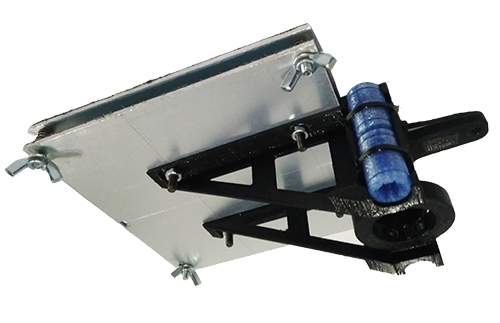
To finish the physical build, the X and Y axes with the hot-end must be added to the machine.
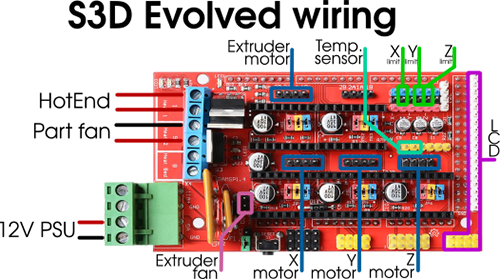
The wiring is similar to any other Arduino Mega + RAMPS based 3D printer. I used a lot of zip ties and some spiral wire organizer to hide and protect the cables. Note about the limit switches: they are wired to X+, Y+ and Z-.
The last step is to program the Arduino Mega with Marlin. Marlin is the open source 3D printer control software. I included a version with the configuration ready to use for this printer in the archive. To install it, follow the official guide on Marlin's website.
To allow the stepper motors to turn, the potentiometers on the drivers (A4988 or DRV8825) must be properly tuned to set the output to about 70% of the rated current of your motors. See this tuning guide.
Configuration and usage
To slice my models, I use Cura. My Cura profiles are also in the archive at the end of this article. Once it is configured, the printer is ready to use!
This video showcases Skeleton3D Evolved:
Although S3D Evolved can be challenging to build, it is a great machine, easy to use and very reliable. Furthermore, it is extremely compact and transportable. This is how to print:
- Import a STL file in Cura, and change the settings according to your needs (infill %, layer height...);
- Export the Gcode to the SD card, eject it, and insert it into the printer's interface;
- From the printer's lcd, choose the file, and print!
Links and downloads
This archive is a ready-to-use package to build and use Skeleton 3D Evolved. It includes all of the STL 3D parts, the BOM, Marlin software and the Cura profile.
If you need the source files (SolidWorks format) for the parts I designed, use this button:
Download 3D source files (for Solidworks)
The original Skeleton3D by Catastrophe is available on Github and Thingiverse.
Special thanks to Imprimante3DFrance form their filament and to Catastrophe for his great work on the original printer.
License information:
- All of the original parts are released under CC-BY-NC license.
- My "Evolved" parts are released under CC-BY license.
Please share your upgrades to help me improve this machine!
Author: Charles Grassin
What is on your mind?
Sorry, comments are temporarily disabled.
#1 Janus Cas
on June 5 2019, 17:34
#2 Author Charles
on June 5 2019, 18:51
#3 javo
on February 17 2020, 5:16